Marine Electrical Check List from Pearson Marine
Howard [ Just Imagine ] 31-Dec-1969
Batteries (Technical)
12V Wiring guide (Technical)
Alternators (Technical)
Balmar High Output Alternators
We installed two large, 100A Balmar alternators on the engine, both for redundancy and for maximum output and minimum engine run time.
If you are going to run a 40HP engine at anchor, you might as well let it do as much work as possible.
The refrigerator compressor is mounted in place of the standard Perkins alternator and the two alternators are mounted on custom brackets above and below. The bottom alternator mounts to the engine mount bracket.
Each alternator has a separate regulator. One connects directly to battery bank 2 which runs the inverter, and the other connects to the battery selector switch so that I can direct the charge current to bank one or two or both.
The separate engine start battery trickle charges though both a battery combiner and a battery isolator.
One of the biggest challenges with the dual alternator installation is making sure that the belts are perfectly aligned to avoid belt wear, and making sure that there is enough belt to pulley contact to avoid slippage.
Belt dressing spray is only a very temporary solution and belt slippage is the most common alternator charging problem under heavy loads.
It is important to use the best quality belts. I purchased the better quality type from Napa Truck and Auto Parts.
I purchased a second power take off pulley for the Perkins 4.108 from Foley marine.
Currently one belt drives the fresh water pump and both alternators. The second belt drives the refrigerator compressor and one alternator.
It might have been better to have one belt run the waterpump and fridge, and have the second belt run off the fridge to the two alternators. This would give better belt-pulley contact and reduce side loading on the power take off pulley and thus the front bearings and seals.
Howard [ Just Imagine ] 01-Jan-2008
Just Imagine Alternators (Technical)
Wind generator (Technical)
On Just Imagine we mounted an Air X Marine wind generator on a custom made bracket on the mizzen mast. We bought the generator from West Marine for about $800.
Wind generators are great, but require a lot of wind to drive them. In 10 knots of wind you get less than 1 amp, at 15 knots : 4 amps, at 20 knots: 10 amps. They really start to come into their own at 25 knots when you get about 20 amps. The generator cuts off before it gets to 35 amps in 30 knots of breeze and it automatically slows down the propeller blades to avoid damage.
Unfortunately, most often you are anchored in more sheltered waters and do not get much output from the wind generator. But it works great when it does blow.
This is the drawing that I gave to the welder.

I gave the welder a pencil sketch of the shape of the mizzen mast. I just bent a small strip of aluminum around the mast to get a template for the shape. Before he welded the mast brackets we test fitted them on the mizzen.
Once completed, the whole structure was powder coated white. In 2005, the whole thing cost me $328.60 from Suntower Marine Fabricators in Fort Lauderdale (954) 764-0751
215 SW 28th St
Fort Lauderdale, FL 33315
The small hatch was intended to make the connections, but, because the thick wires were so stiff, I ended up using this hole with a piece of string to pull the stiff wires down the pipe after the connections were made outside the pipe at the top.
The string then tucks inside the hole, ready for when you need to remove the generator again for service. This worked out well, and I would recommend including this hatch.
The brackets attached to the mast with twelve 1/4" countersunk bolts threaded into the mast, with lots of silicone sealer forming a gasket.
See the
wiring diagram here.
Howard and Jayne [ Just Imagine ] 22-Jan-2008
Service and Support (Technical)
Southwest Wind Power provides excellent service and support.
When my unit failed, I called on the telephone from Greece, and they talked me through some tests. When we determined that the regulator board had indeed failed, they sent me a replacement part, all the way from Arizona to Europe, at no cost. Excellent!
The phone number in Flagstaff Arizona is +1 928 779 9463.
Replacing the regulator board took quite a bit of skill and dexterity, even for an experienced technician like myself, but if you are careful, and follow the instructions, most anyone could do it.
Howard [ Just Imagine ] 22-Jan-2008
Mizzen Bracket (Technical)
This is the drawing that I gave to the welder.
I gave the welder a pencil sketch of the shape of the mizzen mast. Before he welded the mast brackets we test fitted them on the mizzen.
Once completed, the whole structure was powder coated white. In 2005, the whole thing cost me $328.60 from Suntower Marine Fabricators in Fort Lauderdale (954) 764-0751
215 SW 28th St
Fort Lauderdale, FL 33315
The small hatch was intended to make the connections, but, because the thick wires were so stiff, I ended up using this hole with a piece of string to pull the stiff wires down the pipe after the connections were made outside the pipe at the top.
The string then tucks inside the hole, ready for when you need to remove the generator again for service. This worked out well, and I would recommend including this hatch.
The brackets attached to the mast with 12 x 1/4" countersunk bolts threaded into the mast, with lots of silicone sealer forming a gasket.
Howard and Jayne [ Just Imagine ] 22-Jan-2008
Wind Gen Wiring (Technical)
I mounted the wind generator at the spreaders, rather than the mast head for several reasons. To keep the unit at a more easily serviceable location, to keep the weight of the unit lower down, to reduce the length of the cable run in the mast and therefore the required size of the cables(The longer the cable run the thicker and heavier the cable requirements).
This position worked well when I needed to service the unit last year. I could stand on the spreaders while working on the generator. It would have been a nightmare at the mast head. The generator is quite heavy and unwieldy, and at the masthead I would not have been able to use a halyard to secure it or to lower it.
You cannot skimp on the cable sizes. I ran some heavier, #4 (20 mm
2)wires from the batteries to the mast base and then #6 (13mm
2) wires up the mast to the turbine.
At my main distribution panel I included 30 Amp breaker, which fed the turbine onto the main 1/0 AWG (50mm
2) battery bus. This eliminated the need for a fuse, and allowed me to totally isolate the wind generators from the batteries, if needed.
Nearer to the mast, I mounted a 30 Amp meter and the stop switch. The stop switch removes the connection from the battery and shorts the black and red coming from the turbine. This acts as a brake which slows down the turbine when not in use. This reduces noise, and wear and tear.
 Howard [ Just Imagine ] 22-Jan-2008
Solar panels (Technical)
Free docks often do not provide electric hookups and neighbors don't like one running engines to charge batteries. So I finally broke down and bought an 80W solar panel for the boat.
After doing some research, I found that there is not a lot between different brands of solar panels and all panels of a particular size put out the same current. The 80 Watt panel measures 47.3" x 20.8" x 1.3" (1200 x 527 x 56 mm) and puts out about 4.5 amps maximum in direct sunlight.
It is interesting that many of the panels are branded by fuel oil companies such as Shell, BP, Total or Mobil; I suppose doing their bit for a greener planet.
I mounted the panel on top of my bimini top, putting a few screws through the stainless steel bows and through the fabric into the aluminum frame.
When installing a panel, the most important thing to watch for is that the whole panel is in sunlight with no shadows. The shadow of just a halyard over the corner of the panel will cause the output to drop considerably (like from 4.5 down to 1.0 amps).
While it helps to angle the panel to face the sun, it does not make a huge difference, as long as the whole panel is in sunlight, so you probably don't need to have the panels hinged and adjustable, as this compromises the strength of the installation, especially in foul weather( there is a lot of windage on those panels). So I mounted mine flat on top of the bimini on the starboard side. I hope to buy a second panel soon for the port side.
Many people have the panels attached to the top rails outside the cockpit, and then hinge them up like wings to face the sun, and fold them down when they are sailing, or when it it is not practical to have them up. Some installations have a specially constructed stainless steel arch with the panels secured flat on the top (see photo below).
Regulation
There are a couple of options for regulating the output of the panels. The cheaper option cuts the panel off when the battery reaches a certain level, and the more expensive model electronically regulates the flow to the batteries. I considered going without any regulation, since I had 600 AH of batteries and 4.5 amps of charge is not ever going to do them any harm, especially when I am drawing some current. But in the end I got cold feet and bought a very sophisticated regulator for about €150.
The installation was easy, as I simply tied it in with the wind generator and shared the same breaker.
Cost
The panel cost €450 and I now wish that I had bought two of them. I would hardly ever need to run my engine with 7 or 8 amps trickling into my batteries all day long.
The cost is not that bad when you consider the cost of the gallon or more of diesel (€4) one would use every day to charge batteries when you are sitting idle at anchor for extended periods.
I have seen some boats with 5 panels and even they wish they had more. Some minimalist, purist yachties will balk at so much power usage, but when your yacht is your full time home, there is no need to skimp on the comforts and technologies like refrigeration, computers, TV, microwaves and proper lighting that can quickly eat away at your battery levels. Refrigeration current is the main killer on most yachts.
A funny side effect of having free solar energy and no need to run the engine at anchor is that your hot water does not get heated when you don't run the engine for a while. Of course, the solution might be to go totally green and use a sun shower.
When not connected to the batteries or a load, the voltage on the terminals of a single panel should read 21 volts on a voltmeter.
You can hook two panels in series for 24 Volt systems, but it is equally important that no shadow falls on either of the panels.
See the
wiring diagram here.
Howard [ Just Imagine ] 09-Feb-2008
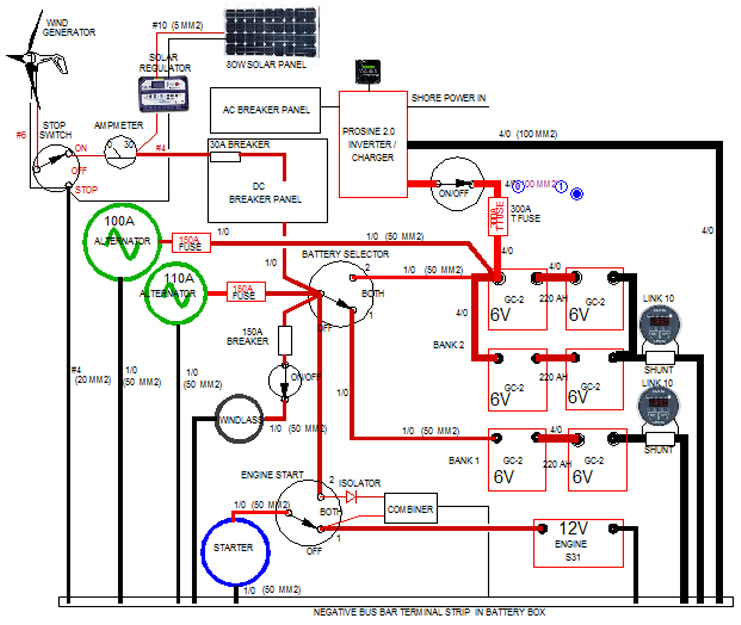
Just Imagine 12V Diagram (Technical)
Just Imagine has two banks of house batteries and a dedicated engine start battery (see the diagram below). The house batteries are all 6 Volt, 220 Amp Hour, flooded, lead acid, deep cycle Golf Cart batteries which seem to give the most bang for the buck for the size and cost.
Bank one consists of 2 batteries in series for 12V - 220 Amp Hours, and bank 2 consists of 4 batteries in series/parallel for 12V - 440 AH. Bank 2 connects directly to the inverter.
There are two 100A Balmar alternators each with their own smart regulators for total redundancy. One alternator charges bank 2 and the other alternator can be directed to bank 1 or two or both.
The engine start battery is charged through an isolator and a combiner to keep it totally separate. It can be switched to the house batteries if needed.
Howard [ Just Imagine ] 12-Mar-2008